Sunday, December 3, 2017

Duck Fat Potato Galette


In the North of the North Hemisphere we have access to an overwhelming number of vegetarian ingredients.  While this gives Northerners plenty of inspiration and opportunity for vegetarian cooking, this recipe isn't one of those offerings. It could be, but the duck fat (or bacon, if it's on hand) really brings this side into its own.  The point I'm trying to get to is that my vegetarian adventures have also changed my meat ones. I appreciate animal products more and am keen to avoid wasting any part of them. This means bones are used in stock, organ meats prepared and fats rendered and stored for later use. While likely a no-brainer for some of you, I would have thrown out much of the 'extras' a decade ago.

The duck fat used in this recipe came from a duck (my first!) I prepared earlier this fall. I knew ducks were fat birds, but once I trimmed the excess duck fat off this one, was surprised at just how much fat there was. I fried the duck skin, jarred the rendered fat and ate the skin as cracklin. If you're not preparing duck, save your bacon fat for this recipe. I'm sure the results will knock your socks off.

If you don't have a springform pan, you can arrange the potatoes without one. This shouldn't impact the taste of the galette. I used a mandoline to slice the veggies and always do when I need thin and relatively uniform cuts of a product. They usually run anywhere between $20-$60, take up very little space and should last you for..well, forever. Here's the version we have:  https://www.amazon.ca

Adapted From: https://www.bonappetit.com

Serves 4

Ingredients

  • 2 lbs Yukon Gold potatoes, sliced 1/4" thick
  • 1 small, yellow onion, thinly sliced.
  • 2 T duck fat, melted
  • 3 T unsalted butter, melted
  • 1 t caraway seeds
  • 1 t flake salt 
  • 1/2 t fresh ground pepper 

Method

Preheat oven to 425F. Cover a baking sheet with a piece of tin foil or parchment paper.  Place a 10" springform ring in the centre of the sheet.

Heat the caraway seeds in a frying pan for a minute, or until they become fragrant. Pour the seeds into a resealable plastic bag and crush them with a rolling pin.

In a bowl, combine 2 tablespoons of the melted butter, duck fat, salt, pepper and seeds. Mix well and then add the potato slices, coating them evenly with the fat mixture. In another bowl, combine the remaining tablespoon of butter with the onion slices, coating evenly.

Arrange about a 1/4 of the potatoes on the base of the springform pan, to cover the bottom. Top with a thin layer of onion slices and repeat with a layer of potatoes and onions, ending with a final layer of potatoes. Bake for 45 minutes or until the potato edges have browned and look crispy. 


Sunday, June 18, 2017

Dukkah-Roasted Cauliflower Salad with Creamy Avocado Dressing


This is definitely summer food and the kind I love most of all: food that introduces me to new ingredients and ignites my curiosity. Enter dukkah, an Egyptian spice blend comprised of ground hazelnuts, sesame seeds, coriander and cumin. There are variations to this blend, but that's the combination I stuck with. I'm sure I could have found dukkah at a specialty grocer, but had all the ingredients in hand to make it myself. Combined with the thick yoghurt dressing and roasted veg, it enriches the smokey flavours of the salad and helps make it a meal.

I used herbs from my own patio garden for this recipe. I don't have much of a green thumb, but have trialled herb combinations, soils and pot sizes. Year after year there have been improvements and this year, the plants have taken off. With the success of my herb garden, I've been looking for ways to include herbs not in the original recipes. I added flat leaf parsley to this one for that reason.

If you have nut allergies, the hazelnuts can be substituted for pumpkin seeds. A creamy feta would also be delicious with it. There are lots of opportunities to substitute ingredients if you can't find or can't eat certain items. Of course for the meat lovers, shaved prosciutto would be fantastic overtop.

Donna Hay's website is bookmarked on my laptop. Her recipes are appealing to me regardless of what mood I'm in. I've made comfort food, desserts and healthy entrees from her collection of ideas. Check it out if you're looking for inspiration.


Adapted from: https://www.donnahay.com.au

Serves 4

Ingredients

Dukkah

  • 1/3 cup hazelnuts
  • 1/4 cup sesame seeds
  • 1 T coriander seeds
  • 1 T cumin seeds
  • 1 T ground pepper
  • 1 t flake salt

Salad

  • 1 head cauliflower, chopped into florets
  • 2, 400ml cans of chickpeas, rinsed and drained (or 1 cup of dried)*
  • 1/4 cup olive oil
  • 1 t flake salt
  • 2 T dukkah
  • 1 bunch of radishes, cut in half
  • 1 cup of mint leaves
  • 1 cup of flat leaf parsley leaves
  • 2 avocados
  • 1/2 cup Greek yoghurt
  • 2 T dill, chopped
  • Juice of half a lemon
  • 1/4 cup of water

Method

Dukkah

Preheat oven to 400F. Place the hazelnuts on a baking sheet and bake for 15-20 minutes. Remove from heat, let cool and then place in a towel. Rub the hazelnuts to remove the skins and set aside.

In a pan on medium heat, toast the sesame seeds until light brown, Remove from the pan and add the coriander and cumin seeds. Heat until they start to pop. Place all of the ingredients in a blender or food processor until well ground. The dukkah should keep for several months if well sealed.


Salad

Preheat oven to 425F. Line two baking sheets with parchment paper and spread the chickpeas and cauliflower over each of the sheets. Drizzle with the olive oil and dukkah and bake for 30 minutes or until the cauliflower has browned on the edges.

Prepare the salad dressing by combining the yoghurt, half of one avocado, dill, lemon juice and water in a blender and mixing until smooth.

To make the salad, distribute the radishes, parley and mint leaves over the cauliflower and chickpeas. Place slices of the remaining one and a half avocados and then the dressing overtop. Season with a little additional salt and pepper and serve immediately.


Monday, May 22, 2017

Grilled Chicken With Mango Salsa & Black Beans


Summer is definitely around the corner. I'm nursing my first light sunburn of the year and doing some hardcore research on patio-worthy cocktails (personal fave: Oaxaca Old Fashioned). The barbecue's getting a good work out and my outdoor plants are already potted. Did I mention I'm into summer cocktails (Oh look, so is Martha: http://www.marthastewart.com)?

I'm also spending considerably less time in the kitchen these days since I started working out of town three days a week. I eat camp meals on those days and when home, I look for food that's much simpler to prepare and recipes that include fresh ingredients.

This grilled chicken is a good example of fresh and low maintenance eating. The chicken can be prepped in the morning and then pulled out of the fridge when ready to assemble the salsa and preheat the barbecue. This recipe also highlights my interest in recipes with fewer simple carbohydrates.  In this example, the chicken is served with beans instead of or along with rice. The marinade is also sugarless. Aside from the natural-occurring sugars in the fruit and veg, we're holding back on the simple carbs in order to keep energy and insulin levels more stable between meals, helping to avoid the crashes that come with starch-rich meals. This isn't Atkins, folks; this is just an attempt at choosing foods that make this chef feel well, longer. Anyways, I need to save room for the carb-light cocktails.

Ingredients

Adapted from: http://www.iwashyoudry.com

Serves 4

Chicken
  • 4, boneless, skinless chicken breasts
  • 2 t coarse salt 
  • 1 t freshly ground pepper
  • Juice of 1 lime
  • 1/3 cup canola oil
Salsa
  • 1 large mango, diced
  • 2 medium tomatoes, chopped
  • 1/3 cup red onion, chopped
  • Juice of 1 lime
  • 2 T chopped cilantro
  • 2 serrano peppers, minced
Beans

From: http://www.iwashyoudry.com
  • 2 cans black beans including the water
  • 2 cans diced chilis
  • 1/4 cup red onion, minced
  • 1 t garlic powder
  • 1/2 t cayenne pepper
  • 1 T olive oil
Method

Wash and pat dry the chicken breasts. Place them in a large sealable plastic bag and add the remainder of the ingredients. Refrigerate for at least 2 hours or overnight. When ready to cook, heat the barbecue to 400F. Grill for approximately 3 minutes each side or until cooked through to the centre. While grilling, try flattening the breasts with a spatula (we used a cast iron skillet) to ensure the entire breast gets exposed to the grill heat.

Combine the salsa ingredients and set aside.

For the beans, heat the olive oil in a frying pan on medium heat. Add the onions and saute until translucent. Add the cayenne and garlic powder, stirring well to ensure the onions are coated with the spices. Pour in two cans of undrained black beans and the chilis and allow to simmer for 4 minutes.

Spoon the beans into shallow bowls and top with chicken breast and the salsa. 


Monday, April 24, 2017

Chocolate Dulce De Leche Thumbprint Cookies

Oh the weather outside is frightful...again. This shouldn't come as a shock to anyone living in Alberta. April and May are bound to have some less than predictable weather. The unpredictability of it is almost predictable. I am working in Northern Alberta under a fly-in, fly-out arrangement and my flight home Thursday evening was grounded for three hours courtesy of a juicy snow storm. Finally Edmonton got hit with the same snow two days later. It'll melt quickly and then reappear sometime in May usually for one last hurrah.

So instead of grumbling about it, I pulled out the wool socks, jogging pants and went to work in the kitchen making strawberry preserves, a few hot meals, salads and these delicious cookies. They are rich, moist and chewy. The kind of 3pm treat you look for with an espresso or other strong brew. I gave a bunch of mine away for fear that I'd have a a moment of weakness and eat them all. Good move on my part as they happen to be great for sharing.


From: https://www.donnahay.com.au

Makes 24 cookies

Ingredients

  • 1/2 cup of unsalted butter, softened
  • 1/2 cup berry or caster sugar
  • 1 t vanilla extract
  • 1 egg  yolk
  • 100g dark chocolate melted and cooled slightly
  • 1 cup all purpose flour, sifted
  • 1/4 cup Dutch cocoa powder, sifted
  • 3/4 cup dulce de leche


Method

Preheat the oven to 325F. Put the butter and sugar in a standing mixer blend until creamy; about 2 minutes. Add the vanilla, egg yolk and chocolate and process until combined. Finally, add the flour and cocoa and process until the mixture forms a ball. Place the mixture in a bowl or remove the base of the mixer if possible, cover with plastic wrap and refrigerate for 30 minutes. Roll a tablespoon each of the mixture into balls and place on two lined baking sheets. Indent the centre of each cookie by pressing your thumb into each one. Bake for 12-14 minutes and allow to cool a little on the sheets before transferring them to a rack. Spoon a dollop of the dulce de leche onto each cookie.

Tuesday, April 11, 2017

Asian-Inspired Pork Cabbage Rolls with Peanut Sauce


Ukrainian and other Eastern European cultures are well acquainted with the cabbage roll. Every celebratory meal has either the vegetarian or pork-filled option, floating in tomato sauce and while I can get behind a plate of perogies, I never get excited to see the cabbage roll.

This, however, is not the cabbage roll I know. This version is loaded with garlic, ginger, soy, a hint of fish sauce and topped with a nutty overture. I can dig it. In fact I did and have plenty of leftovers. I struggled to find Napa cabbage in good shape (aka Suey Choy) and had fewer cabbage leaves to use than pork filling. I wound up cooking the leftover filling and adding the scraps of cabbage left as a sort of sloppy cabbage roll. There was plenty of the peanut sauce to pour over both the rolls and remaining filling. Rolling the cabbage rolls was easy, but preparing the recipe in one pot is doable and  involves less cleanup.

Whatever you choose, I can assure you'll get excited about these cabbage rolls.

Adapted from: http://fedandfit.com

Serves 4-6

Ingredients

  • 1 head Napa cabbage

Filling

  • 2 T salted butter
  • 2 carrots, grated
  • 5 cloves garlic, minced
  • 1, 2-inch thumb of ginger, peeled and minced
  • 2 lbs ground pork
  • 3 green onions, sliced
  • 1/4 cup chopped cilantro leaves
  • 2 T soy sauce
  • 2 t fish sauce
  • 1 t red pepper flakes
Sauce

  • 1 T sesame oil
  • 2 cloves garlic, minced
  • 1/3 cup soy sauce
  • 2/3 cup water
  • 2 t fish sauce
  • 1 T cider vinegar
  • 1 T brown sugar
  • 1/2 cup smooth peanut butter

Method
Bring a large pot of water to a boil, reduce to simmer and place the head of cabbage, leaves downward into the pot. Let the cabbage poach for 10 minutes. Remove from the water, cut the end off and separate the leaves, laying them on a paper towel to cool and dry.

To kick off the filling, melt the butter in a large saucepan and add the carrots, ginger and garlic. Stir well to combine and cook for about 8 minutes. Add the mushrooms and sauté for another 5 minutes.

Place the carrots in a bowl along with the rest of the filling ingredients and combine the ingredients with your hands to ensure it's well incorporated.

Make the rolls by place about 1/4 cup of the filling on the base of the stem of each leaf. Fold the sides of the cabbage inward and roll towards the end of the leaf. Place the rolls in a 9'X13' baking dish and preheat the oven to 350F.

To make the sauce, heat the sesame oil in a frying pan on medium heat. Add the garlic and sauté for about 5 minutes. Add the rest of the ingredients, whisking the sauce until smooth and allow to simmer for 5 minutes. The sauce will thicken on its own.

Place the cabbage rolls, neat in the oven for 30 minutes. Remove and add half the sauce over the rolls, returning them to the oven for another 15 minutes.

Serve on a bed of rice, quinoa, freekeh or neat with chopped cilantro to garnish.


Monday, April 3, 2017

Roasted Cauliflower Salad with Lemon Tahini Dressing


I'm in the midst of a love affair with cauliflower. It's my first choice on the party veggie tray and its emergence as a main dish has got me intrigued. Roasting it adds yet another dynamic to this interesting vegetable and it pairs well with any protein if you'd prefer it as a side.

For those who set it aside and favour other more colourful vegetables, don't. Cauliflower's pretty competitive as far as vitamins and nutrients containing 73% of your daily recommended intake of vitamin C and almost 20% of vitamin K in a cup of the cooked variety (http://www.whfoods.com). It also peaks in spring and fall, so now is the time to eat it. Finally, cauliflower comes in 4 colours: orange, yellow, purple and green. Who doesn't love experimenting with a little colour!

From: https://www.budgetbytes.com/
Serves 4-6

Ingredients

Salad

  • 1 head cauliflower
  • 1/2 red onion
  • 2 T olive oil
  • 1/2 bunch Italian parsley
  • salt and pepper to taste

Dressing

  • 1/3 cup tahini
  • 1/3 cup water
  • 2 cloves garlic
  • 1/4 cup lemon juice
  • 1/2 t cumin
  • 1/4 t cayenne pepper
  • 1/4 t salt

Chickpeas

  • 2 cups cooked chickpeas
  • 2 T olive oil
  • 1/2 t paprika
  • 1/4 t garlic powder
  • 1/8 t cayenne pepper
  • salt to taste


Method

Preheat the oven to 450F. Prepare the cauliflower by washing and cutting up the head into bite-size pieces. Slice the red onion into wedges, about a centimetre thick. Toss both into a bowl, add the oil, some salt and pepper and mix well. Spread the veggies onto a baking sheet and place in the oven for 20 minutes. Remove from the heat, toss and flip the roasted veggies and return them to the oven for another 10 minutes.

While the veggies are roasting, combine all the dressing ingredients into a blender and emulsify. Next prepare the chickpeas by heating the olive oil in a frying pan on medium heat. Add the spices, combining them with the oil and finally include the chickpeas. Brown the chickpeas for about 10 minutes, or until the chickpeas become golden-brown.


Sunday, March 26, 2017

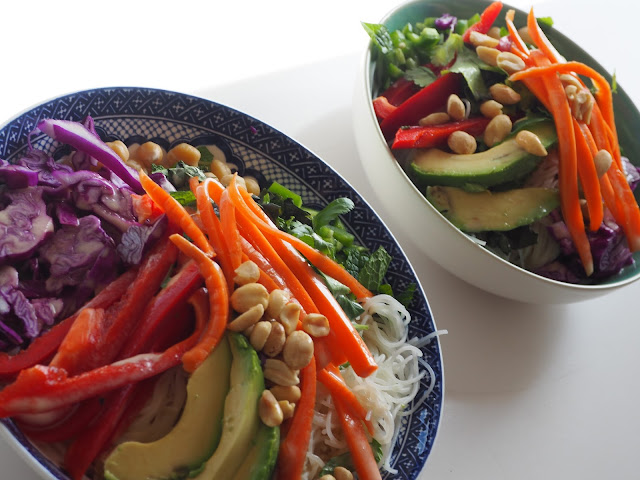
Rainbow Noodle Bowls


We make a version of this dish a few times a month for several reasons: It's healthy, versatile and who doesn't love the chance to get rid of leftover veggies lurking in your fridge? The formula is simple: a protein, assorted veg, a starch base and a sauce to add some kick to the ensemble. This particular recipe is Vietnamese-inspired and includes mint, basil and cilantro tossed in with some roasted peanuts. If I have herbs on hand, they go in. If I don't, I add nuts or seeds in abundance to finish off the dish. I had old carrots I pickled overnight in existing brine and when you combine the whole song and dance, it almost looks as if you know what you're doing. 

The base is usually rice, but I've tried soba noodles and had leftover rice vermicelli noodles that I've been meaning to use. Often the sauce is a bibimbap or ginger variety that I've played with a bit. 

What brings me back to this dish is the fact that it can be meatless and I don't feel as if anything is missing. I have made countless vegetarian dishes, many of which aren't posted on this blog because they tasted as if they were missing meat (aka shitty). With these Asian-inspired noodle or rice bowls, I enjoy the depth of flavours with beans. tofu or lentils added to it and never think to myself "this would taste better with meat in it." That's what I call a success story.

Adapted from: http://pinchofyum.com

Serves 3-4

Sauce
  • 1/3 cup lime juice
  • 1/3 cup vegetable oil
  • 1/4 cup fish sauce
  • 2 cloves garlic
  • 2 T rice vinegar
  • 2 T brown sugar

Bowl 
  • 200g vermicelli noodles
  • 1 cup cooked chickpeas
  • 1/2 red pepper sliced thinly
  • 1 jalapeño, seeded and minced
  • 1/2 avocado, sliced
  • 1/2 cup red cabbage sliced
  • 2 carrots, julienned (I had leftover brine from a jar of pickled onions and popped them in the brine the night before)
  • 1/4 cup each, cilantro, mint and basil chopped
  • 1/4 cup roasted peanuts

Method

To make the sauce, combine all the ingredients in a blender and pulse until smooth. 

Prepare all the vegetables and protein and set aside. For the vermicelli noodles, fill a large pot with water and bring to a boil. Remove from heat, add the noodles, submersing them in the water. Let sit for five minutes. Remove from water and portion immediately into two bowls. Top with the veggies, herbs, nuts and drizzle sauce overtop. Now eat, eat, eat!


Sunday, February 26, 2017

Spiced Pear Upside-Down Cake


Happy New Year! Happy Chinese New Year! Wait, let's try this on for size: happy first quarter of 2017! I know I'm a little late to the party, but I hope your healthy resolutions have been set aside. If not, you are about to break them and make a cake that'll knock your socks off. Yes, you!

I took a little hiatus in January and February and walked the Camino de Santiago, a pilgrimage in Northern Spain. Foodies delight in the variety of treats one can find along the way. Unfortunately, most cafes and restaurants are closed in January because who in their right mind would walk across Northern Spain in the winter?! In fact, entire towns are closed for the most part, which makes one feel like the lone survivor in a zombie apocalypse. As the only survivor, I indulged in tuna with bread, chorizo with bread and cheese with bread. My delightfully beige diet was handy under the circumstances, but somewhat uninspiring.

I wasn't hard done by. I did, however get a little tired of the food updates from my partner-in-crime who was in St. Anton and Barcelona enjoying their four-star food scenes. Sometimes it's just best not to share all of your good news. I played catch up at the end of my trip and enjoyed some Spanish delicacies from the North and a few Catalan favorites in Barcelona. What struck me most were the fantastic pho, sushi and contemporary dishes I also found. The non-Spanish food was pretty remarkable.

This is my first post for 2017 and I was sure I'd be inspired by Spain's Northern cuisine to want to write about it. Instead, I'm just inspired to eat well and write about it. That's what I'm going to do.

I saw a picture of this cake on Pinterest and couldn't quite absorb it at first. The original recipe calls for pomegranate molasses, which gives the batter almost a dark chocolate color. The golden pears pop amidst that background and the combination along with great photography wooed me.  I didn't have pomegranate molasses, but used honey with a few squeezes of lemon instead to give the cake the sweet and tart combination that the molasses offers. I also didn't have walnuts readily available, so swapped walnuts in the batter for almonds. I would make this again. The pears are fantastic, especially when balanced with the almond and citrus in the cake. Of course it's also vehicle for whipped cream, which is pretty much the only reason I make cake in the first place.

As with most social media pics, the original was a work of art. Mine, was less arty and a little more avant-garde:


Notice that one pear has been ostracized from the rest. Maybe they had an argument in the oven; we'll never know. Anyways, this is what my baking looks like: it's not going to win any awards, but oh my, it is tasty.

Adapted from: http://www.bonappetit.com

Ingredients
  • 2 1/2 T unsalted butter, plus more for the pan
  • 1 1/2 cups all purpose flour, plus more for the pan
  • 3 T fresh orange juice
  • 1/4 cup runny honey
  • 1 t lemon juice
  • 1 3/4 cups sugar
  • 4 small, ripe Bosc pears (one of mine went missing-would rather not talk about it)
  • 1 cup, unsalted almonds
  • 1 1/2 t baking powder
  • 1/2 t baking soda
  • 1/2 t salt
  • 1/4 t ground cardamom
  • 4 large eggs
  • 1 t orange zest
  • 1 cup olive oil
Method

Preheat oven to 350F. Coat a 10 inch round cake pan with butter and cover the base with parchment paper. Coat the sides with a little flour.

Cook the 2 tablespoons of butter, orange and lemon juice, honey and a quarter cup of sugar in a frying pan on medium heat until the sugar has dissolved and the sauce has reduced. This should take about 4 minutes. Add the pears, cut side up and let cook for about 3 minutes, or until some of their juices are released. Flip the pears and cook face down for another 3 minutes. Let cool for a few minutes and then arrange the pears, cut side down on the bottom of the pan. Return pan to heat and allow the liquid to cook another 4-5 minutes, or until the mixture becomes syrupy. Pour mixture over the pears and keep in the freezer while you prepare the batter.

Blend the almonds and cup and-a-half of flour in a food processor until the nuts are finely ground. Pulse in the baking powder, baking soda, salt and cardamon.

Using an electric mixer on medium speed, combine the orange zest, eggs and remaining sugar until smooth; about 4 minutes. Add the dry ingredients in two batches, ensuring each batch is well blended before adding the next. Follow with the oil, adding it gradually until blended. Pour the batter over the pears and place pan on a foil-covered baking sheet. Bake for 50-60 minutes or until a toothpick comes out clean once inserted into the cake.